


Articles
Plate Storage Bench Building Tutorial
July 9, 2018

July 9, 2018
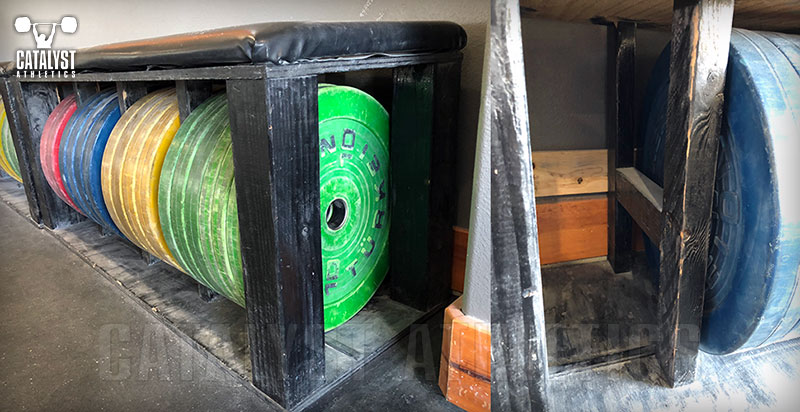
I built four of these suckers a few years back when Catalyst Athletics moved from its first to second location, and I stupidly didn’t take photos along the way and put together a building tutorial like I have for a number of other things [9-10-21: Reader Conner Allred was kind enough to send photos of his build, which I've added at the end of the article]. I’ve gotten so many requests since first building them that it just seems ridiculous at this point to not put something together about them. So here we go.
The concept is simple: you need a place to store plates and butts. This bench handles both with style. The exact measurements are of course to fit the plates we have, which are the old Werksan economy plates, so make sure you measure your own plates before you commit to your final assembly (only the spacing of the inner supports will be affected—all plates are the same diameter).
Cut/Part list:
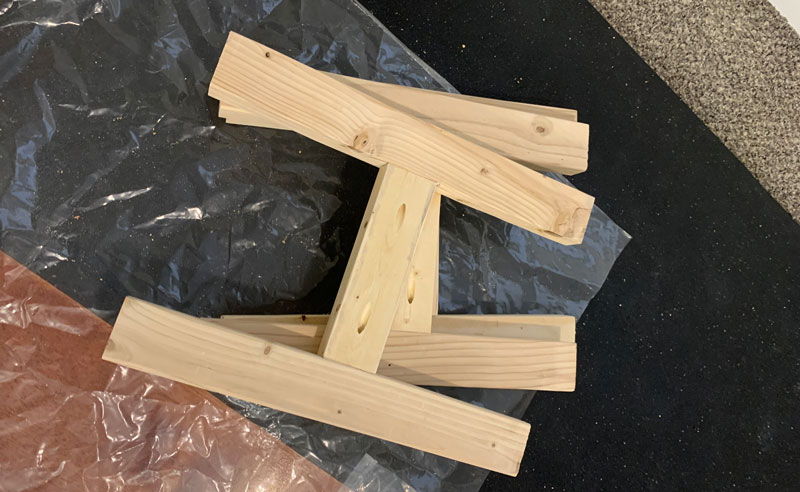
Screw a 4x4 post into each corner of one of the ¾” ply sheets.
Get your plate measurements for your H support spacing. I built ours to hold 2 25s, 4 20s, 4 15s and 6 10s with an H support between each section. Your plate layout is totally up to you, but it will determine where you place the H supports, so plan ahead.
Screw the H supports to that same sheet of ply with the back edge of one upright lined up with the back edge of the ply, making sure they’re square with the edges.
Throw the other sheet of ply on top of this assembly and screw it down to each corner post and each vertical piece of the H supports (make sure they’re plumb!).
Corner posts, H supports and trim strip
Now take that little trim strip and lay it on the bottom sheet of ply right up the back edge of the front vertical piece of the H supports. This is simply to create a ridge to prevent the plates from rolling right out of the bench. It’s a good idea to double check the position of this strip (especially if you’ve used 2x4s instead of 2x3s and aren’t sure of your math)—throw a plate on, make sure it’s centered front-back, and that strip should be pressed right up against the plate where it meets the bottom sheet of ply. Once you have the position figured out, glue it down, or you can tack it in with a brad nailer.
If the bench will be up against a wall you don’t want marked up or damaged, or not against a wall at all, you’ll need to cover the back of the bench with either a sheet of plywood, or add a strip of wood to stop the plates from rolling out the back.
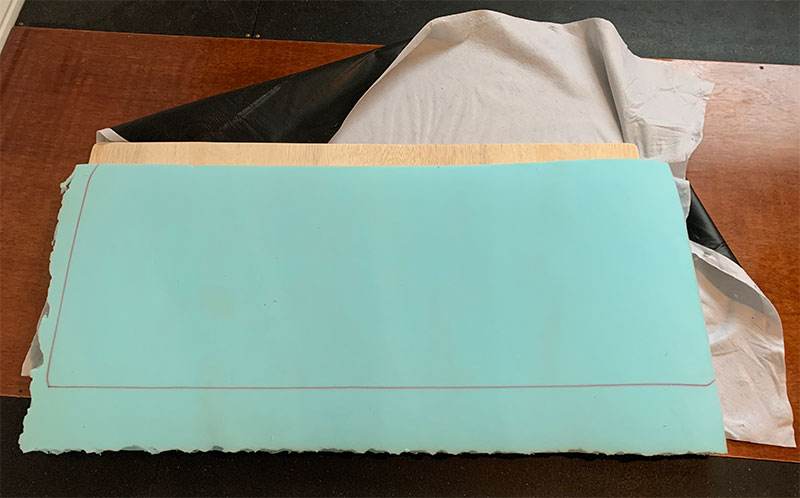
To assemble the butt holder, lay out a sheet of vinyl upside down, center a sheet of foam, and then lay the last sheet of ply on top of the foam (you can glue the foam to the ply if you want, but that’ll make it more work if you want to replace it later). Fold the vinyl over snugly and tack it down to the ply with staples or roofing-type nails (just make sure they’re not long enough to go through the ply).
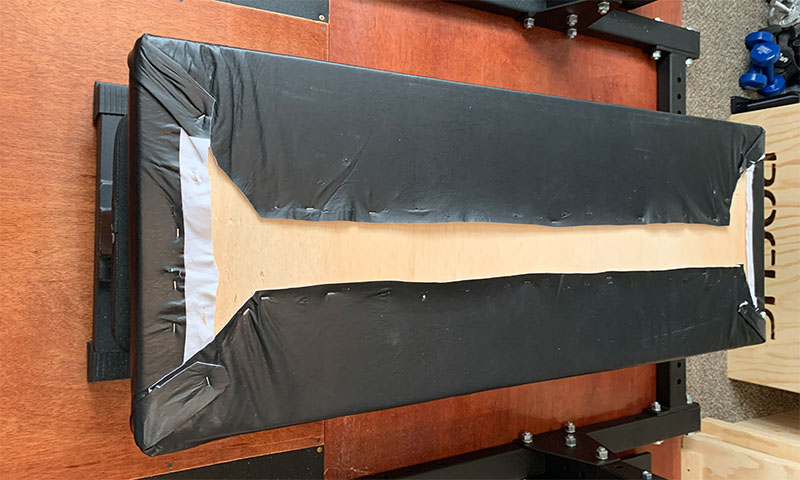
Flip that assembly over and set it on top of the bench assembly, and screw them together from underneath—again, make sure the screws don’t go through the ply so you don't end up sitting on one.
Throw some black paint on to disguise any shortcomings in your craftsmanship and you’re all set.

The concept is simple: you need a place to store plates and butts. This bench handles both with style. The exact measurements are of course to fit the plates we have, which are the old Werksan economy plates, so make sure you measure your own plates before you commit to your final assembly (only the spacing of the inner supports will be affected—all plates are the same diameter).
Cut/Part list:
- (2) 18 x 48” pieces of ¾” plywood
- (1) 18 x 48” piece of ½” plywood (can be ¾”)
- (4) 18½” long 4x4s
- (6) 18½” long 2x3s
- (3) 9” long 2x3s
- (1) 48” long ¼”-thick trim strip (half round or similar)
- 18 x 48” foam sheet
- Vinyl sheet (about 30 x 60”)
- Various size screws
- Tacks or staples
Screw a 4x4 post into each corner of one of the ¾” ply sheets.
Get your plate measurements for your H support spacing. I built ours to hold 2 25s, 4 20s, 4 15s and 6 10s with an H support between each section. Your plate layout is totally up to you, but it will determine where you place the H supports, so plan ahead.
Screw the H supports to that same sheet of ply with the back edge of one upright lined up with the back edge of the ply, making sure they’re square with the edges.
Throw the other sheet of ply on top of this assembly and screw it down to each corner post and each vertical piece of the H supports (make sure they’re plumb!).
Corner posts, H supports and trim strip
Now take that little trim strip and lay it on the bottom sheet of ply right up the back edge of the front vertical piece of the H supports. This is simply to create a ridge to prevent the plates from rolling right out of the bench. It’s a good idea to double check the position of this strip (especially if you’ve used 2x4s instead of 2x3s and aren’t sure of your math)—throw a plate on, make sure it’s centered front-back, and that strip should be pressed right up against the plate where it meets the bottom sheet of ply. Once you have the position figured out, glue it down, or you can tack it in with a brad nailer.
If the bench will be up against a wall you don’t want marked up or damaged, or not against a wall at all, you’ll need to cover the back of the bench with either a sheet of plywood, or add a strip of wood to stop the plates from rolling out the back.
To assemble the butt holder, lay out a sheet of vinyl upside down, center a sheet of foam, and then lay the last sheet of ply on top of the foam (you can glue the foam to the ply if you want, but that’ll make it more work if you want to replace it later). Fold the vinyl over snugly and tack it down to the ply with staples or roofing-type nails (just make sure they’re not long enough to go through the ply).
Flip that assembly over and set it on top of the bench assembly, and screw them together from underneath—again, make sure the screws don’t go through the ply so you don't end up sitting on one.
Throw some black paint on to disguise any shortcomings in your craftsmanship and you’re all set.


