


Articles
Jerk Block Building Tutorial
March 31 2009
March 31 2009


Jerk blocks are a somewhat mythical piece of equipment—their numbers are extremely small and there appears to be a constant search for plans to build them. After two years of Aimee busting my chops to build her some, with the new gym and the corresponding space, I found myself with no further excuses to put it off.
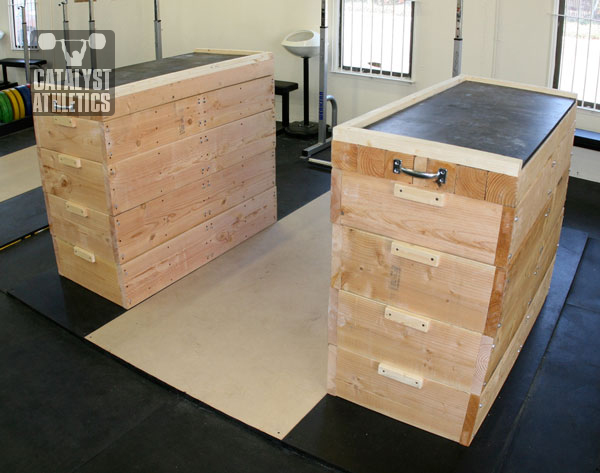
The design I ended up with is not really anything new—build multiple blocks that stack on top of each other to allow adjustment of the final height to accommodate different athletes. This is the same basic design used by Les Simonton, which is where I got the idea.
These blocks are on the small side—they’ll easily fit on a standard 8x8’ platform with 2’ wide rubber on each side—but they’re big enough in our experience. This size makes them a bit more manageable in terms of relocating them to free up the platform on which they normally reside and for changing the height. If you want larger blocks, just adjust the measurements below.
The nice thing about this type of block setup is that they can be used as pulling blocks as well - as low as about 14".
The total cost on the blocks was somewhere around $300, not including the gas for multiple trips to Lowes to compensate for my lack of planning, plus several years off my life.
What You’ll Need
Basically:
An obscene amount of wood, screws and bolts
Specifically:
- (7) 2x10x12
- (4) 2x8x12
- (4) 2x6x12
- (4) 4x4x12
- (2) 2x4x8
- (2) ¾ x 8 x 10 pine
- (4) ¾ x 1 ½ x 8 pine
- (1) 4x6 ¾” rubber horse stall mat (or scraps = (2) 2x4 sections)
- (4) sturdy metal gate handles
- ~280 3” drywall screws
- ~160 1.25” drywall screws
- ~160 3.5” x 5/16” lag screws
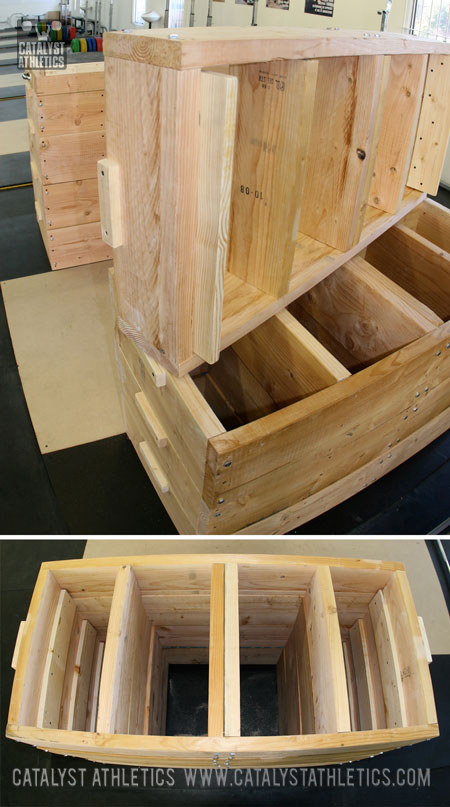
Building the Stackers
First thing we need to do is cut the sections for the stackers. We will be building (6) total 10” tall stackers, (2) 8” stackers, and (2) 6” stackers. For each one, we’ll need (2) 48” lengths and (6) 20” lengths. Cut all of these and set aside.
Next we need to cut the tabs that will keep the blocks from sliding when the bar is dropped on them. Rip the 10” pine in half and cut (16) 19.5” lengths. With rough-grit sandpaper, round the corners and edges of one of the long ends. This will make the tabs slide in and out much more easily when stacking the blocks and help prevent any splintering or splitting. Measure 2.5” along the short end and draw a pencil line at this level down the long dimension of the board. Set them aside.
Grab the ¾”x1.5” pine and cut (20) 6” lengths. With rough-grit sandpaper, smooth out the corners and edges of one side. These will be our stacker handles. Set aside.
Assemble the basic frame of each stacker with (2) 48” lengths and (2) 20” lengths—the 20” boards will be inside the 48” boards. Take your time and use a square to make sure the boards are aligned—the little extra time this takes now will save you huge headaches later. Pre-drill and screw together with (3) 3” drywall screws for each joint (top, middle, bottom).
Once this frame is done, measure 12”, 24” and 36” along the length of each 48” side. These will be your markers for the inside boards. At the 12” and 36” marks, align a single 20” board and pre-drill and screw with (3) 3” drywall screws. At the 24” mark, align a pair of 20” boards, pre-drill and screw.
Collect the handles we cut earlier. Pre-drill and screw with 1.5” drywall screws into the top middle of each short side of each stacker. You can measure if you want, but the approximate center will work fine.
With the stacker assembly complete, you can now drill holes for the 3.5” lag screws. Place (2) at each corner and in each end of each center board. You can save time by assembling all the stackers with screws only first, and then drilling out all stackers together, and placing the lag screws together.
To finish the stackers, we need to place the tabs. Set aside one pair of 10” stackers—these will be the bottom blocks and will not have tabs.
Flip the first stacker upside down (handles on the bottom edge) and clamp a tab inside one of the short ends, placing the pencil line we left along the edge of the stacker board—in other words, there should be about 2.5” of the board protruding up. You’ll have about ¼” of space on either side of the tab between it and the long boards of the stacker. Use 1.5” drywall screws to secure the tab—I used (7) screws per tab in a staggered arrangement.
You can now stack these things up while we build the top piece.
Building the Top
The top of the blocks is a heavy chunk that you will find moving endlessly pleasurable. It may be tough to move around, but it will hold anything you can drop on it.
Cut each 4x4x12 into (3) 4” lengths. Cut one of the 2x4x8s in half for (2) 4” lengths. Cut (4) 20” lengths from the other 2x4 (cut these just shy of 20”—more like 19 7/8”).
Lay (6) of these 4x4 sections flat on the floor with (1) of the 2x4 sections in the middle. Use a spare board to align the ends.
Place on of the 6” stackers on top of this assembly and align the corners. Make sure the 4x4s are pushed tightly together. Place one of the 20” 2x4 sections flat against the 4x4s inside the stacker and up against the inside of each short end. We’re just using the stacker as a guide for the placement of these 2x4s—basically place the 2x4 as far toward the ends of the 4x4 assembly as possible. Pre-drill and screw the 2x4 into the 4x4s (and the 2x4 in the middle) with 3” drywall screws. Use (4) screws in a square pattern for each 4x4, and (3) in a line for the outer 4x4s and middle 2x4. Remove the stacker and flip the 4x4 assembly over. Repeat for the other top piece. Sand the bottom edges and corners of the 2x4s down a bit to allow them to slide in and out of the stackers more easily.
Cut from the ¾”x1.5” pine into (8) 22 ¼” and (4) 44 ¾” lengths. Stack (2) of the short pieces along the short edge of the 4x4 assembly, pre-drill and screw. Stack (2) of the long pieces along one long edge of the 4x4 assembly (its ends will be between the short pieces), pre-drill and screw. These will help prevent errant bars from rolling of the blocks too easily.
Cut (2) pieces of the rubber mat to 44 7/8” x 22 7/8”. Slide them onto the 4x4 assemblies inside the pine edges and screw in at the corners (1” drywall screws work fine if you have any around).
Finally, pre-drill and screw the metal gate handles to the center of each short end of each top piece. Use the 3” drywall screws instead of the screws that likely came with the handles—these things will be holding some serious weight.
Stack and Play
Throw the top pieces on the rest of the stack and go to town. Dropping on the blocks will be pretty loud—you can reduce the noise and the bounce of the stackers somewhat by pulling the bar down as it hits rather than just letting it bounce freely. This is a good practice anyway because it ensures you’re hanging onto the bar and less likely to let it bounce in some odd way to either hit you or roll off the blocks and hit someone else.
Why Use Jerk Blocks?
The simplest reason to employ jerk blocks in an athlete’s training is to allow multiple reps at heavier weights. Rep work in the jerk is limited by how much weight an athlete can bring back down to the shoulders from overhead. Often this weight is limited considerably by elbow positioning, upper and lower body strength disparities, or simply poor lowering technique.
I don’t personally believe that athletes should ever eliminate all lowering phases of jerk training, but there are plenty of instances in which block work will allow important training that isn’t otherwise possible.

The design I ended up with is not really anything new—build multiple blocks that stack on top of each other to allow adjustment of the final height to accommodate different athletes. This is the same basic design used by Les Simonton, which is where I got the idea.
These blocks are on the small side—they’ll easily fit on a standard 8x8’ platform with 2’ wide rubber on each side—but they’re big enough in our experience. This size makes them a bit more manageable in terms of relocating them to free up the platform on which they normally reside and for changing the height. If you want larger blocks, just adjust the measurements below.
The nice thing about this type of block setup is that they can be used as pulling blocks as well - as low as about 14".
The total cost on the blocks was somewhere around $300, not including the gas for multiple trips to Lowes to compensate for my lack of planning, plus several years off my life.
What You’ll Need
Basically:
An obscene amount of wood, screws and bolts
Specifically:
- (7) 2x10x12
- (4) 2x8x12
- (4) 2x6x12
- (4) 4x4x12
- (2) 2x4x8
- (2) ¾ x 8 x 10 pine
- (4) ¾ x 1 ½ x 8 pine
- (1) 4x6 ¾” rubber horse stall mat (or scraps = (2) 2x4 sections)
- (4) sturdy metal gate handles
- ~280 3” drywall screws
- ~160 1.25” drywall screws
- ~160 3.5” x 5/16” lag screws
Building the Stackers
First thing we need to do is cut the sections for the stackers. We will be building (6) total 10” tall stackers, (2) 8” stackers, and (2) 6” stackers. For each one, we’ll need (2) 48” lengths and (6) 20” lengths. Cut all of these and set aside.
Next we need to cut the tabs that will keep the blocks from sliding when the bar is dropped on them. Rip the 10” pine in half and cut (16) 19.5” lengths. With rough-grit sandpaper, round the corners and edges of one of the long ends. This will make the tabs slide in and out much more easily when stacking the blocks and help prevent any splintering or splitting. Measure 2.5” along the short end and draw a pencil line at this level down the long dimension of the board. Set them aside.
Grab the ¾”x1.5” pine and cut (20) 6” lengths. With rough-grit sandpaper, smooth out the corners and edges of one side. These will be our stacker handles. Set aside.
Assemble the basic frame of each stacker with (2) 48” lengths and (2) 20” lengths—the 20” boards will be inside the 48” boards. Take your time and use a square to make sure the boards are aligned—the little extra time this takes now will save you huge headaches later. Pre-drill and screw together with (3) 3” drywall screws for each joint (top, middle, bottom).
Once this frame is done, measure 12”, 24” and 36” along the length of each 48” side. These will be your markers for the inside boards. At the 12” and 36” marks, align a single 20” board and pre-drill and screw with (3) 3” drywall screws. At the 24” mark, align a pair of 20” boards, pre-drill and screw.
Collect the handles we cut earlier. Pre-drill and screw with 1.5” drywall screws into the top middle of each short side of each stacker. You can measure if you want, but the approximate center will work fine.
With the stacker assembly complete, you can now drill holes for the 3.5” lag screws. Place (2) at each corner and in each end of each center board. You can save time by assembling all the stackers with screws only first, and then drilling out all stackers together, and placing the lag screws together.
To finish the stackers, we need to place the tabs. Set aside one pair of 10” stackers—these will be the bottom blocks and will not have tabs.
Flip the first stacker upside down (handles on the bottom edge) and clamp a tab inside one of the short ends, placing the pencil line we left along the edge of the stacker board—in other words, there should be about 2.5” of the board protruding up. You’ll have about ¼” of space on either side of the tab between it and the long boards of the stacker. Use 1.5” drywall screws to secure the tab—I used (7) screws per tab in a staggered arrangement.
You can now stack these things up while we build the top piece.
Building the Top
The top of the blocks is a heavy chunk that you will find moving endlessly pleasurable. It may be tough to move around, but it will hold anything you can drop on it.
Cut each 4x4x12 into (3) 4” lengths. Cut one of the 2x4x8s in half for (2) 4” lengths. Cut (4) 20” lengths from the other 2x4 (cut these just shy of 20”—more like 19 7/8”).
Lay (6) of these 4x4 sections flat on the floor with (1) of the 2x4 sections in the middle. Use a spare board to align the ends.
Place on of the 6” stackers on top of this assembly and align the corners. Make sure the 4x4s are pushed tightly together. Place one of the 20” 2x4 sections flat against the 4x4s inside the stacker and up against the inside of each short end. We’re just using the stacker as a guide for the placement of these 2x4s—basically place the 2x4 as far toward the ends of the 4x4 assembly as possible. Pre-drill and screw the 2x4 into the 4x4s (and the 2x4 in the middle) with 3” drywall screws. Use (4) screws in a square pattern for each 4x4, and (3) in a line for the outer 4x4s and middle 2x4. Remove the stacker and flip the 4x4 assembly over. Repeat for the other top piece. Sand the bottom edges and corners of the 2x4s down a bit to allow them to slide in and out of the stackers more easily.
Cut from the ¾”x1.5” pine into (8) 22 ¼” and (4) 44 ¾” lengths. Stack (2) of the short pieces along the short edge of the 4x4 assembly, pre-drill and screw. Stack (2) of the long pieces along one long edge of the 4x4 assembly (its ends will be between the short pieces), pre-drill and screw. These will help prevent errant bars from rolling of the blocks too easily.
Cut (2) pieces of the rubber mat to 44 7/8” x 22 7/8”. Slide them onto the 4x4 assemblies inside the pine edges and screw in at the corners (1” drywall screws work fine if you have any around).
Finally, pre-drill and screw the metal gate handles to the center of each short end of each top piece. Use the 3” drywall screws instead of the screws that likely came with the handles—these things will be holding some serious weight.
Stack and Play
Throw the top pieces on the rest of the stack and go to town. Dropping on the blocks will be pretty loud—you can reduce the noise and the bounce of the stackers somewhat by pulling the bar down as it hits rather than just letting it bounce freely. This is a good practice anyway because it ensures you’re hanging onto the bar and less likely to let it bounce in some odd way to either hit you or roll off the blocks and hit someone else.
Why Use Jerk Blocks?
The simplest reason to employ jerk blocks in an athlete’s training is to allow multiple reps at heavier weights. Rep work in the jerk is limited by how much weight an athlete can bring back down to the shoulders from overhead. Often this weight is limited considerably by elbow positioning, upper and lower body strength disparities, or simply poor lowering technique.
I don’t personally believe that athletes should ever eliminate all lowering phases of jerk training, but there are plenty of instances in which block work will allow important training that isn’t otherwise possible.


1. The plans are short two of the 2x10x12's and also short one of the 3/4x8x10.
2. When all was said and done it ran me closer to $380 for all the supplies. Lumber is more expensive here in the north-east and I had spend extra for pressure treated 4x4x12 as they didn't have anything else.
3. The tabs on the 8" and 6" stackers have to be shortened by 2" and 4" respectively, otherwise they won't stack properly.
4. Use a 7/32" bit for pre-drilling the lag bolts. This makes it real easy to power the bolts in flush with a power drill.
5. Finally, cutting the horse stall mat was challenging. I marked the boundary with adhesive tape and used a utility knife. I changed the blade several times and it was slow going but it did the job.
All told it took me about a week to complete it working although I only worked part time for four of the seven days. I have been testing them over the past few days and they seem to be able to take a beating. Also, Greg wasn't kidding about how tough it is moving the platforms around .. those sucker are really heavy and bulky.
One issue we are seeing with them is the pine tabs do break off easily. If I did it over again I would use a stronger wood with two bolts per tab instead of the shallow wood screws. One the other hand the platforms are absolutely indestructible.
I am planning on building blocks with your plans.
What do you think of Frank Herman's observations on this board about certain modifications of the plans?
Also, I am 6'3"ish. Should I modify it for height? Will the plans as given be enough for my height.
Finally, you mentioned noise. I thought about adhering a thin piece of rubber matting along the perimeter where the boxes sit atop one another. Is this impractical?
I am building two sets of these for a big weight room. One thing I don't see is where the tabs are? As I look at the picture I don't see any tabs, but I know something has to keep these from sliding off of each other. Do you have a picture of the tabs on the block? Also, why all the screws and all the lag screws? Do you need both just because of all the weight?
I was going to make the tabs out of hickory for strength-good idea?
A few thoughts:
-wood is expensive these days. expect to have around $400 in total supplies by the time its done
-plan to make them a little bit lower than you think you want them to be. I squat down a bit to secure the weight, and can stand up with it with a good amount of clearance, but I have had issues with bumpers hitting the blocks when I dip down for a push press or push jerk.
-find a partner to help you stack and move these things. they are heavy!
Me and a friend are both students so we were looking for the cheapest option and used wooden pallets, the top two of each block we reinforced enabling us to drop directly onto them
So far so good!
I am currently short three to four (2x10x12s) , and just some simple math shows that the plans are short of enough boards to make six (10") stackers, and that assumes that every board is exactly 12 feet (144 inches) long.
I haven't finished the other stackers yet, but I assume they will be short a couple.
I don't doubt the materials list is off a bit - I wrote this after building so I had to go back and figure what the materials were.
However, it shouldn't be a real problem getting 3 4' lengths out of a 12' board - if you're extremely precise, you'll come up slightly short, especially if you trim the ends to make them perfectly square - I neither did this nor was extremely precise. That's why I'm not in the cabinetry business. The lengths being off by 1/16 - 1/8" or so due to the width of cuts won't cause you a problem, and I'd rather be off that much than buy way more wood to account for such a small discrepancy.
My Youth Lifters have benefited the most. I have a 44kg 12 year old who really struggled with 40kg "Rack Jerks" and now just 'snaps up' 50kg, with the greatest smile a 'kid' could give,
Great, Great design and, very much, appreciated.
2) Use a sliding compound mitre saw for the 2"x10" cuts to keep them precise. You'll lose accuracy if you have to flip the board over to continue the cut.
3) Get some 24" clamps ($20 ea.) or a "band clamp" ($13 @homedepot) to hold things steady while you drill/screw.
(4) Put the clamped & squared wood assembly on a flat, even surface for drilling/screwing. Your lifting platform will work perfect for this. Place some 45# plates on the corners to keep things from moving while you're working.
(5) The lag screws are expensive. $23/box of 50 @ Home Depot. That caught me off guard on my cost estimates. I found some for about half-price on Ebay (otherwise avoid Ebay please). I also used 5/16" washers @ 10 cents ea.
(6) It might be possible to use some self tapping Spax hex head zinc 3.5" x 4" construction screws in place of the 3.5" deck/dry wall screws & 3.5" lag bolts altogether. This would save a lot of pre-drilling. I don't think the 3.5" deck screws are doing much after you get the lag bolts in anyway. You might triple up on each joint rather than use only 2 lag bolts per joint on the 10" & 8" sections.
(7) If you do decide to use 3.5" drywall/deck screws get the Spax T-Star Torx screws and don't pre-drill. Not having to push in on the phillips head to drive the screw will keep things from sliding around and will save your energy for all the work. I also used the Spax torx head for the 1.5" screws with no pre-drilling even on the 3/4" material and didn't experience any splitting.
(8) I found I didn't need the wood handles on each section. Once you tilt the section up from the side it's easy to grab by the cross supports inside and move it around. No handles also lets you stand the sections on end.
(9) I used 1"x1.5" oak on the tops but only on the ends. I moved it away from the edges just a bit to keep from getting damaged while moving the tops around.
(10) You can't get (2) 4' cuts and (6) 20" cuts from (2) 12' boards. Due to that I only used single cross supports in the middle so only (5) 20" cuts per section required. I also used treated 4"x4" so my tops are heavier/stronger.
(11) I didn't put rubber mats on top. I have plenty around the garage; just not sure if it's really needed yet.
(12) I put both metal handles on one side of the tops. If you put them on the ends once you stretch your arms out 4' to grab the handles you'll be out of position to lift. Also, I set the tops on the ends when moving around and didn't want to bang up the handles. With the handles on the side it's a simple hang clean pull to get the tops up high. :)
(13) Since I let my wood get wet before construction and I didn't have a sliding compound saw I have a couple of 10" sections that won't lay flat. I think that's causing a spring effect and one of my boxes is moving around more than I'd like.
Good luck and don't underestimate the amount of work required to do this.
6) It might be possible to use some self tapping Spax hex head zinc 5/16" x 4" construction screws...
My thinking on the screws and the "lag bolts" is that it is seriously over-engineered. I'm not complaining as I know the 3" screws and the fastenmaster ledger locks are more than enough, but my thinking is that it would have been much quicker to just use three fastenmaster ledger locks instead of 3 3" screws plus two ledger locks (or lag bolts).
Any experienced carpenters/engineers want to chime in?
I think you're underestimating the abuse these things will take. When I dissassembled them recently, I found probably half a dozen or more sheered screws. I'd much rather spend some extra time in the beginning overengineering than have to come in a repair afterward, especially when one small problem can cause a bunch of other ones.
P.S. I found that a linoleum cutting knife works really well for cutting the rubber mats, it's shaped like a hook so it really digs in. I cut my 3/4" mats in 4-5 passes and the edge came out really nice and strait.
Try using a shim to fill in the portion o fthe floor that is uneven. Otherwise using a filling at the bottom might work as well.
If anyone is interested, I posted pictures here: heaveyduty.com/2013/05/jerk-boxes-pulling-blocks/
Thanks again for everything you do Greg!
You can definitely try it - my concern is that with all the bouncing and shaking, nails would move a bit, but I also tend to way overbuild everything, so it may be fine.
MDUSA makes steel jerk blocks and I believe I saw a set of steel blocks in your gym. I'm willing to build the wood blocks, but I'm also interested in the steel blocks. Would you mind sending a quick pros/cons list of the steel blocks from what you've experienced? ie. noise, adjustability, mobility, etc. Mind sending it through email? havenlw@msn.com Otherwise I'll check back in to this particular forum in another week or so. Thanks for EVERYTHING that you do. Not sure how you pull it all off. You have quite the work ethic.
Cheers. Haven
Main benefit of wood like this is the adjustability all the way down into pulling blocks. Main drawback is the lack of portability. Metal are fine, but limited adjustablility, and the MDUSA and others are also about a foot shorter than these - which are already not huge.
I don't remember off hand - you'll have to do the math. In simple terms, the right height for someone about 5' 10" and taller.
2x10x12 => does it means 2 inches x 10 feet x 12 feet?
Can’t wait to put this on hubby’s honey-do list.
Greg Everett
Alyssa Sulay