


Articles
Quick & Dirty Plate Rack
January 28 2009

January 28 2009


Plate racks are a rip-off. There, I said it. They require minimal, relatively low-quality steel, and aren't exactly remarkable feats of engineering. Instead of spend money on expensive plate racks (most of which aren't that great anyway) that could be put to better use buying... plates... we threw together some simple racks that can store both a full set of bumper plates and the metal change.
The following is a simple guide to doing the same yourself. Keep in mind the thickness of our plates may be different from yours. Make sure you measure the gear you intend to store before cutting your pieces.
What You'll Need (per rack)
Cut Your Wood
Make all your cuts and collect the pieces. If you're patient and meticulous, sand all edges.
Assemble the Change Rack
Mark a line down the center of one of the 17" lengths of 1x4 - this will be 8.5" from either edge. Place one of the 1.5" lengths along the line. Drill pilot holes and screw together.
On the opposite side of the 17" board, repeat the previous, but with the 1.5" piece on the other side of the center line.
To one of these 1.5" pieces, attach the second 17" board with the edges aligned with the first. Finally, screw the 1x6.5x17" board to the bottom of this assembly, with the outside edge of the open 1.5" piece flush with one of the long sides.
Assemble the Frame
Next, assemble the frame of the rack by placing one of the 17" 2x6s at each end inside the two 35" 2x6s. Drill and screw. You may want to leave the screws somewhat short of fully tightened to account for possible variation in the remaining 2x6 dividers.
Insert the Change Rack into the Frame
Slide the assembled change rack into one end of the frame, and enclose with another 17" 2x6. Drill and screw this 2x6 into the long sides of the frame while pushed tightly against the change rack. Next, make sure the top of the change rack is even with the top of the frame, and drill and screw it in.

Install the Bumper Dividers
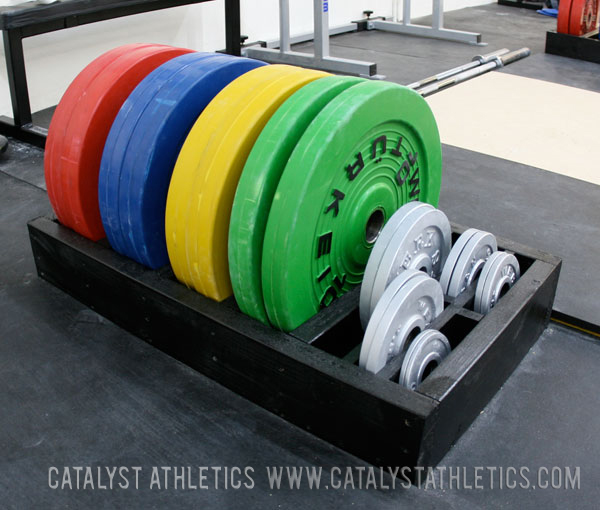
Insert the remaining 17" 2x6s between the frame and drill and screw into place. For our bumpers, the spaces were 5.5", 5", 4.5" and 3.75".
Finish and Use
Paint the rack if you want, and load it up!
The following is a simple guide to doing the same yourself. Keep in mind the thickness of our plates may be different from yours. Make sure you measure the gear you intend to store before cutting your pieces.
What You'll Need (per rack)
- (6) 17" lengths of 2x6"
- (2) 35" lengths of 2x6" (make sure to measure what you'll need for your own plates)
- (2) 1" x 4" x 17" (cheap pine is fine)
- (1) 1" x 6.5" x 17" board
- (2) 1.5" lengths of 1x4"
- 2" and 3" drywall screws (lots)
- Drill, bits, Tape Measure, Square, Pencil
Cut Your Wood
Make all your cuts and collect the pieces. If you're patient and meticulous, sand all edges.
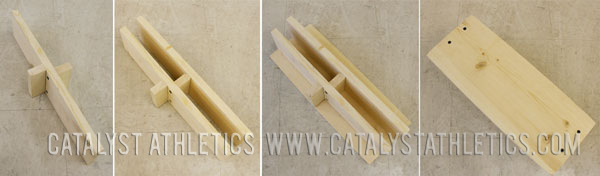
Assemble the Change Rack
Mark a line down the center of one of the 17" lengths of 1x4 - this will be 8.5" from either edge. Place one of the 1.5" lengths along the line. Drill pilot holes and screw together.
On the opposite side of the 17" board, repeat the previous, but with the 1.5" piece on the other side of the center line.
To one of these 1.5" pieces, attach the second 17" board with the edges aligned with the first. Finally, screw the 1x6.5x17" board to the bottom of this assembly, with the outside edge of the open 1.5" piece flush with one of the long sides.
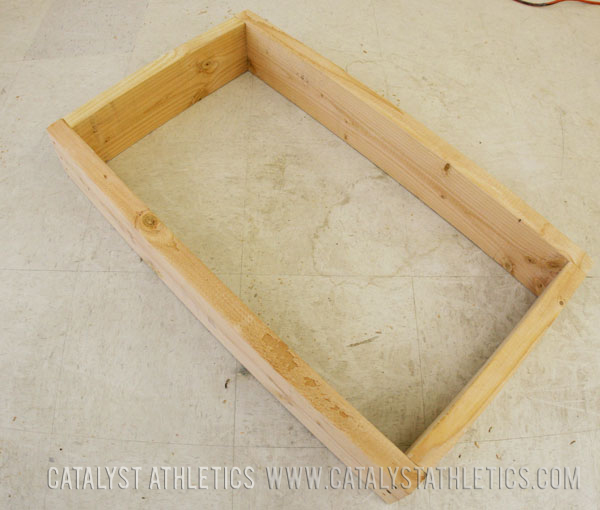
Assemble the Frame
Next, assemble the frame of the rack by placing one of the 17" 2x6s at each end inside the two 35" 2x6s. Drill and screw. You may want to leave the screws somewhat short of fully tightened to account for possible variation in the remaining 2x6 dividers.
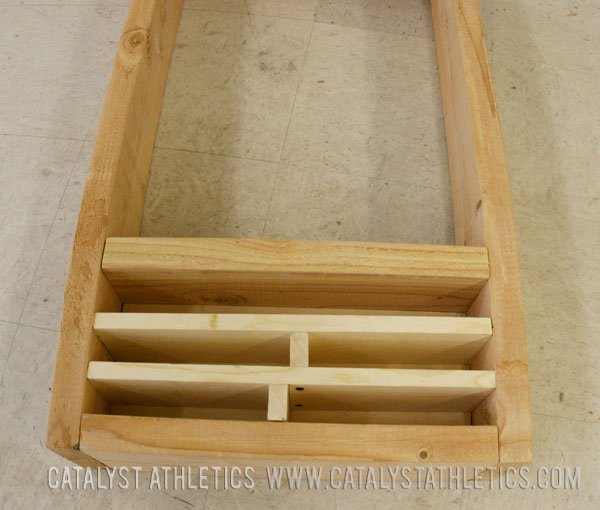
Insert the Change Rack into the Frame
Slide the assembled change rack into one end of the frame, and enclose with another 17" 2x6. Drill and screw this 2x6 into the long sides of the frame while pushed tightly against the change rack. Next, make sure the top of the change rack is even with the top of the frame, and drill and screw it in.
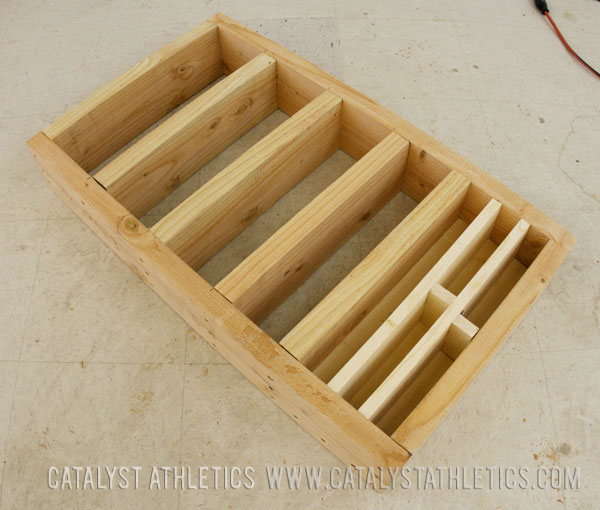
Install the Bumper Dividers
Insert the remaining 17" 2x6s between the frame and drill and screw into place. For our bumpers, the spaces were 5.5", 5", 4.5" and 3.75".
Finish and Use
Paint the rack if you want, and load it up!


Cheap, practical, and attractive! Three of my favorite qualities/attributes. I am going to use your plans and build one of these, too.
BTW, if you add glue to the joints they will be basically indestructible--much stronger than a joint that is fastened with screws alone.
Plates of the same weight can be quite different in thickness (we use kg plates, not lbs, btw, so they're 10, 15, 20, 25 kg). So yes, essentially, but you need to measure the plates you have and adjust the rack accordingly.
Did you leave much play for the thickness of the bumpers to make it easier to get the plates in and out of the rack?
eg. two 25kg bumpers are 5" thick so witdth of 25kg bay 5.25" or 5.5"?
Hope that makes sense
They are not much over the 5" but leaving a millimeter or so to allow some room for both plates should be okay.
Greg Everett
Alyssa Sulay